Remote client IP identification using F5 NLB
Are you struggling to identify the IP traffic source on your servers? When using a F5 NLB at the edge of your network, you won’t be able to identify on your servers where the traffic is coming from. That is unless the protocol can support adding the proper headers to leave a trace of the original IP address. Any traffic received by the server appears to be coming from one of the load balancer IP addresses, which makes it impossible for you to identify the real source of traffic.
Fear not. I’ll explain how to forward traffic using F5 Networks Load Balancer without SNAT (Source Network Address Translation) to allow the server to see the IP of the remote client. This way, you’ll be able to analyze where your traffic is coming from.
How does it work?
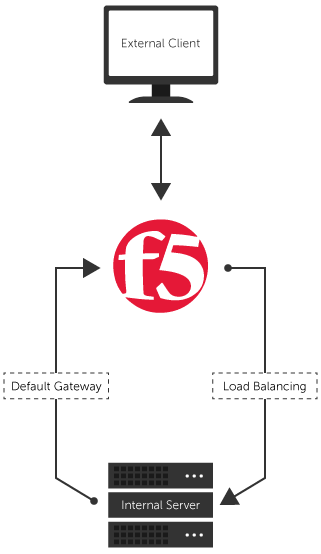
When external traffic comes into the Load Balancer, the Local Traffic Manager (LTM) service distributes it among the internal servers that are part of the load balance. So, the received public IP packets are forwarded to an internal server with a private IP address, but identified with the original IP. The internal server sends responses back to the Load Balancer which self-IP is set as its default gateway, and the Load Balancer forwards it to the original IP (external client).
The schema below should help you visualize the process:
Implementation on F5 Networks Load Balancer
To stop SNAT (Source Network Address Translation) using your F5 Networks Load Balancer, you’ll only need to complete the quick steps below. Once done, you’ll be able to identify the source of traffic to your servers.
- Make sure your server’s default gateway is set to the Load Balancer self-IP so that all outgoing traffic is handled by the F5 Networks Load Balancer.
- Create a new Fast L4 profile and enable the Loose Initiation and Loose Close
- Create an outgoing virtual server configuration with type Forwarding (IP). Use the settings below:
- Destination: Network (Address 0.0.0.0 Mask 0.0.0.0)
- Service Port: * All Ports
- Protocol: * All Protocols
- Profile: Use the profile created in step 2
- Source Address Translation: None.
- Create a load balancing virtual server following your usual process and leave Source Address Translation to “None.”
You should know that once this is done, your Load Balancer will act as a router between external clients and internal servers. Depending on your network design, this might be an issue or something that is not desired.
Moreover, since the Load Balancer is now the default gateway for the internal server, all external communications will go through it.
For these reasons, this type of configuration might not be suited for every organizations. What do you think of using a network load balancer to route traffic? How have you implemented it?
The post Remote client IP identification using F5 NLB appeared first on SherWeb.