Web Deployment Tool released to web (RTW)
The final release of the Web Deployment Tool (aka Web Deploy or MsDeploy) has been released to the web. This is likely more significant than many people realize.
At first glance, Web Deploy seems like a tool for system administrators to copy sites and settings between servers (IIS6 to IIS6, IIS6 to IIS7 and IIS7 to IIS7). It does do that, including SSL, COM, GAC, ACLs, registry, content and more.
However, Web Deploy is likely to become a major deployment method for developers too. Visual Studio 2010 will have native support for Web Deploy, offering the ability to deploy a entire website with the single-click feature of VS2010. What’s also impressive is that it’s so lightening fast. Only the file changes are copied to the server rather than an entire push like you would normally see with FTP. Furthermore, everything is over SSL, making it a highly secure technology.
It doesn’t stop there. Web Deploy extends IIS and addresses some of the common limitations of remote delegated management in IIS. With the Web Deployment Tool properly configured by a web host or system administrator, it’s possible to mark folders as applications with IIS Manager and even recycle, stop or start app pools.
At ORCS Web, we’ve installed this on all of our IIS7 Shared Server solutions so that our customers can enjoy Web Deploy. Until Visual Studio 2010 comes out, IIS 7 Manager is the best tool to leverage Web Deploy features.
Taking Web Deploy for a Spin
To try it out you’ll need a web host or server that supports the Web Deployment Tool. Using the information provided by your server administrator (or web host), connect remotely to IIS 7 using IIS Manager.
Once connected, you will likely get prompted to install some add-ons. Confirm that you want them and approve the install. Don’t let the install fool you. You *must* still install Web Deploy separately since the IIS Manager install doesn’t include everything necessary. Go to the Web Deployment Tool page and download the Web Deployment Tool and install on your local computer. Only the UI components are necessary on the client side. When completed make sure to restart IIS Manager.
Recycling and managing Application Pools
Once you’ve connected and have the Web Deployment Tool installed, you can start to manage your website through IIS Manager in ways not previously possible.
Clicking on “Recycle…” will give another screen allowing you to choose between 4 options:
Hopefully your host or system administrator makes sure that you aren’t sharing the app pool with any other sites, otherwise you will indirectly impact them. Note that these features are only available if your host or administrator supports them. At ORCS Web, we support all features shown in the blog post.
Marking/Setting and Removing Applications
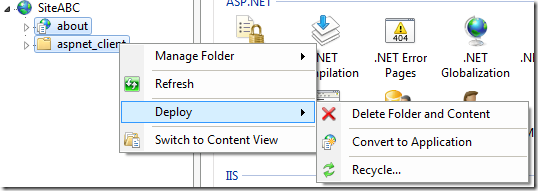
Notice that you can also delete an Application and Content, or if you right-click on a normal folder, you can convert it to an application, as shown in the following image:
Deploying Website
The actual copy features of the Web Deployment Tool aren’t quite as easy, but they aren’t too bad when you understand the concepts. The power of the Web Deployment Tool will make much more sense with Visual Studio 2010, but I’ll detail here how to deploy your website using IIS Manager and the Web Deployment Tool.
First, you need to “export” whatever site you want to deploy, then you “import” it where you want to deploy it to.
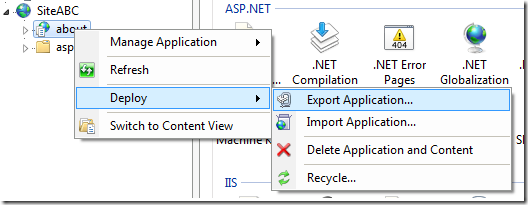
To export your site, right-click on the root of the site or any application and select Deploy –> Export Application. You cannot export a normal folder without first converting to an application. The export step is likely your local site that you want to deploy to the web.
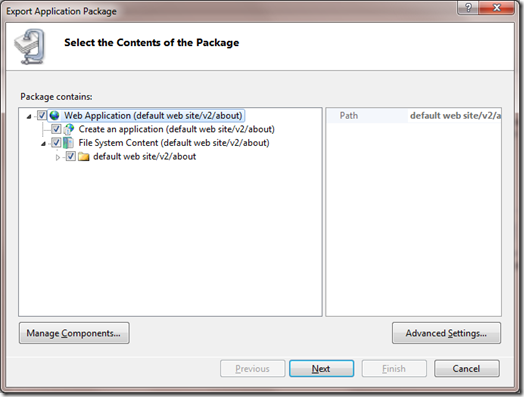
Follow the wizard and make any changes that you need. There are a number of changes and customizations that you can do, although it’s likely that not all of them will be supported by your web host or server administrator.
Press Next –> Next. When you’re prompted for the filename, save to somewhere on your computer and give it a .zip extension. For example c:\MySite.zip.
Now you have a bundled package of your site which the Web Deployment Tool will use on the Import step.
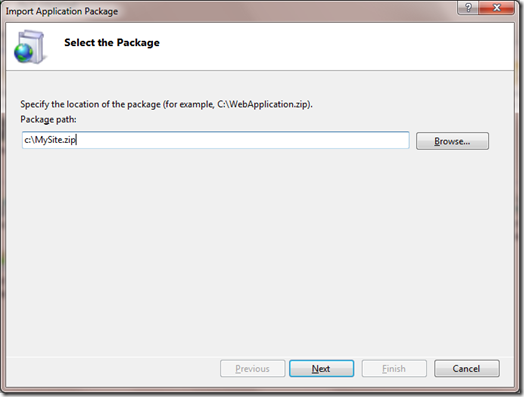
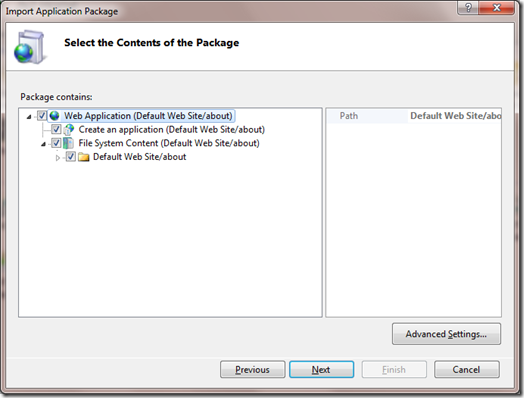
After you’ve created the package, select the destination, which is likely the site or vdir on the remote web server. By now, you know the drill. Right-click –> Deploy –> Import Application. Select the file that you just saved to your local computer.
Press Next and you’ll be presented with a similar screen to what you received during the export. You can edit this for your particular deployment.
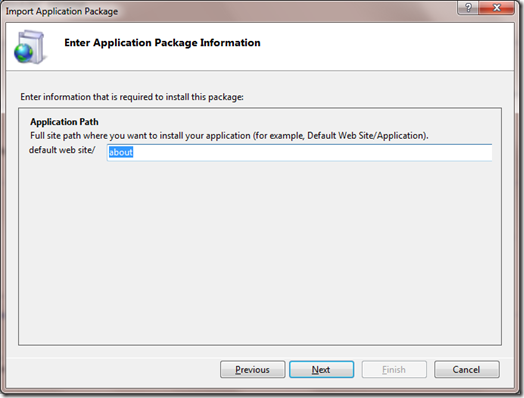
Press Next and you’ll be given a choice of the subfolder that you will create during this deployment.
After pressing Next, your site will be deployed to the server. If you have a large site, only changed will be copied to the server on subsequent deployments.
I expect that the Web Deployment Tool will be used a lot more in months to come. The tool itself works behind the scenes but it will be leveraged from tools like IIS Manager, Visual Studio and likely many more in the coming days. Keep an eye on this tool since we may see more of it.
