Windows Live Writer Plugin to insert Colorized Code
When I installed Windows Live Writer for the first time I was skeptical of having a different blog writer, so far I was very happy using Microsoft Word 2007 as my blog editor. However I decided to give it a try and see what I could get from it.
Now, I can only tell you that I love it, the biggest reason is because it comes with a simple API that allows you to extend it and add functionality to it. This approach of exposing the platform really makes me feel I can do everything, and if I can't, then I can just extend it to do what I need.
In my case every time I blog something that uses code, I always try to "colorize" it (personally find it easier to read when code is formatted using colors). That is the reason I wrote my original Code Colorizer application so that I could just paste the code in, and get the HTML that I would then tweak manually directly in the blog engine.
Now that I'm using Windows Live Writer, I decided to test-drive the extensibility model they expose and wrote my Code Colorizer for Windows Live Writer so that I don't need to hand edit anything.
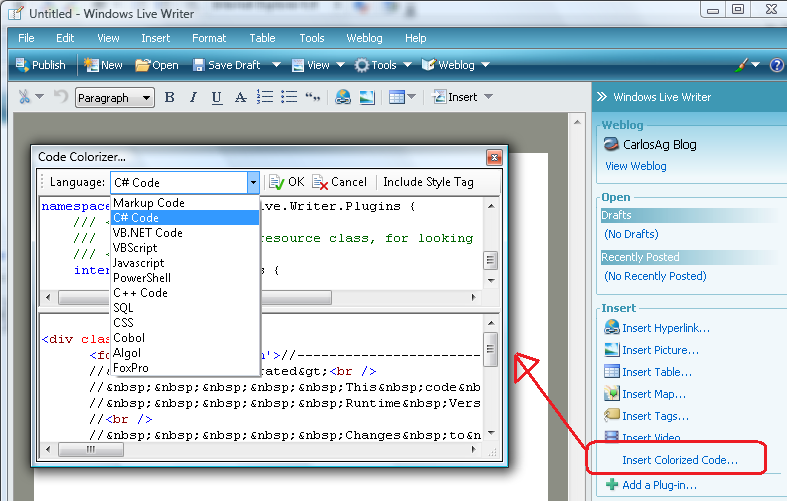
The idea is that you just download the DLL into the Plugins (C:\Program Files\Windows Live\Writer\Plugins) directory, launch Live Writer and now, you will get a task "Insert Colorized Code..." that will show you a dialog where you can either type the code or just paste it and the right HTML will be inserted in your blog.
This for the first time makes it really easy for me to insert formatted code without the need to tweak anything by hand.
You can download it for free at: http://www.carlosag.net/Tools/WindowsLiveWriter/Default.aspx
The following image shows a snapshot of the tool in action: